Wood Plug Drill Press Jig
Cutting wood plugs can be a tedious and time-consuming task. So I built a jig to make it easier.
This jig cuts plugs in long rows on narrow strips of wood, so there’s minimal waste left around each plug. And once the plugs are cut, they can be stored on the long, thin strip or cut from the strip using a bandsaw.
The tips are free to you. Just enter your email in the box at the left, click the“SEND MY BONUS TIPS” button and a new tip will show up in your inbox every Friday.
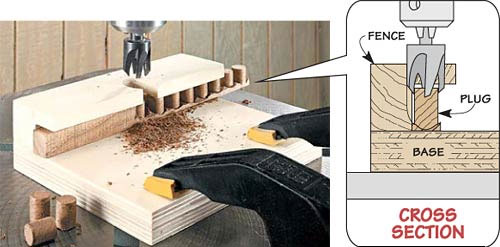
The jig, shown in the photo above, is made up of two parts. The first part is a small (6″ x 12″) plywood base that gets clamped to the drill press table for stability. The second part is a hardwood fence that prevents lifting of the workpiece and guides the plug stock and the plug cutter.
To make the fence, I cut a wide rabbet on the bottom edge. You’ll want to be sure the height of the rabbet is greater than the length of plug you want to make. Finally, glue the fence to the base so the rabbet faces forward.
Then use your plug cutter to cut a guide hole in the top fence. To center the plug cutter over the plug stock, you’ll want to place the guide hole along the back edge of the rabbet and cut away a small amount of fence, as shown in the detail. Now slip your stock in the jig and you’re ready to go.
Good Woodworking,
Phil Huber
Online Editor, ShopNotes